
And so it begins- Bags filled with crushed rock and laid into shallow trenches comprise the foundation of this 20 by 50 foot structure. I don’t have to worry about frost upheavel because that is largely a symptom of foundations constructed with a lot of portland cement in them. Ordinary portland cement and standard concrete are susceptible to frost and they will crack and upheave in very cold conditions and therefore if used in foundations, need to be in deep trenches that make contact with the warmth of the earth at a depth below the frost line. This is why foundations before 1920 in the U.S. and Europe were built above ground and made from stones and or lime in all but the largest and heaviest structures. Single story residential buildings did not require foundations that extended below the frost line simply because they were not constructed of materials which were structurally damaged by freezing.

- bags and barbed wire
Tamped bags, stacked offset like bricks. The first two feet of the foundation wall is comprised of bags filled with rock to aid in drainage if there is ever flooding at the building site; these rock-filled courses are cinched with barbed wire to the course above and below, the barbed wire acting like velcro to lock the bags in place. The bags will be covered in stucco netting and coated with a paper-adobe and lime render as seen in later images in this series.

- Earth bag walls
Here parts of the perimeter wall have reached an above-ground height of six bags: about three feet. Earthen structures settle more than most other buildings, and cement based stuccos do not flex and instead crack, often imperceptably but enough to allow water to seep into them and saturate the wall behind the stucco. Earth plasters and lime based plasters breathe and allow water vapor to escape, and are more flexible. If they do crack, they tend to be self-healing because the cracks fill with tiny, dissolved particles of earth or lime. Walls that breathe instead of trapping moisture are commonly thought to be more healthful to live in as they don’t give rise to mold and mildew problems anywhere near so much as walls with vapor barriers. These softer plasters do require semi regular re-coating, however the benefit is that they do not induce rot in wood or rust in metal or spalling in brickwork, or any other damp related degradation of the base structure. Lime is also a natural fungicide, meaning it inhibits mold growth– many straw bale and wood framed homes have to be torn down due to mold growing inside walls, especially after flooding.

- Bag filling station
I built a two part bag filling station so that one person could easily fill sand bags. Basically a piece of stove pipe screwed onto the base of wooden box with one side and the top open- the back being a sort of backsplash to contain shovel fulls of dirt. This upper piece sits on and fits into a stand which is tall enough to accomodate a sand bag and is not high enough that the bag slips off the stove pipe when filled. Most folks working with sandbags suggest filling them in place, using a coffee can to carry the earth, which is fine if you have a team of people working or if you’re working alone and don’t mind taking years to build a modestly sized house.


Another evening view of filled sand bags awaiting placement into the walls. My dog Snoot can be seen smiling in the shadows…

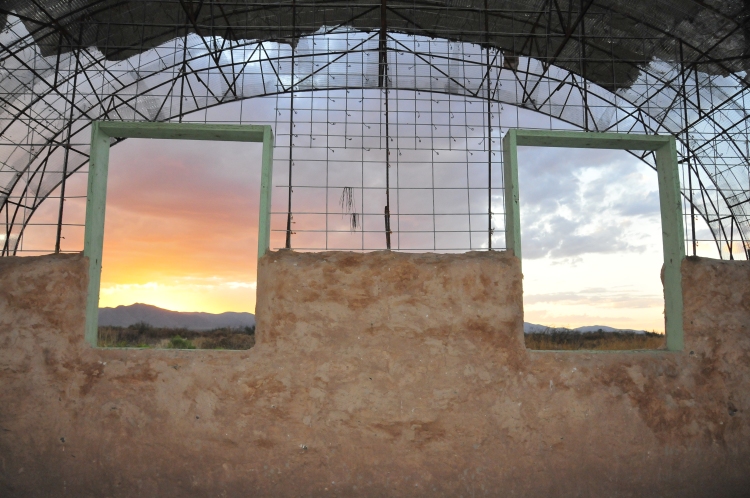
Here, a friend helps stack bags at sunset. A window buck is in place, and this is a shot from inside the structure. The unfinished dirt floor was backfilled using a backhoe mostly, to a height of two feet.

Detail of stucco netting covering the tamped wall of sandbags. I’ve read in earth-bag construction forums that no such netting is required but sooner or later the plastic or burlap bag is going to deteriorate- as I found out it can be a matter of weeks under certain conditions. I’ve seen old adobe buildings where the stucco netting let loose of the underlying adobe blocks and the whole stucco facing actually sloughed off, I’ve seen that with straw bale, too. I’ve also seen straw bale walls with big cracks and sections of stucco sheared off. Stucco netting lends a cohesive web for the stucco/render to grip into, and if that stucco netting is attached through the wall, not just to it- then it can’t simply “let go” and separate from the structural wall section beneath it. I attached each face of stucco netting through the earth bag walls using baling wire laid laterally in strands across the center of each bag, so that the netting could be drawn up tight to the faces of the walls– and attached to the other face of stucco netting on the other side of the wall which prevents either face from being able to pull away and fall off.

In the photo above, a steel (rebar) bond beam is tied to the vertical rebar stakes in the wall, and these stakes will be welded to vaulted roof truss sections. A second horizontal rebar perimeter will be welded into place at the top of the walls.

Another view of the earth bag walls from inside the structure. (above)

I used two different colors of sand bags with uv coating, green and white. Some of the bags I bought which were supposedly uv coated turned out not to have any such coating and they started dissolving within one week which wasn’t a good thing.

Above, sand bags in this section of test wall began degrading within a week of sun exposure in Arizona. They appeared fine but after placing more bags atop them and tamping those newly filled bags, the ones that had been exposed to the sun for a week split apart from the tamping action going on above them. If you build using sandbags, make sure to get uv coated ones as they are otherwise designed to degrade quickly.

A friend tamping a pilaster, which is a form of minor buttress used to stiffen the walls. Straight sections of sandbag wall seem most stable when such a pilaster is attached at ten foot intervals and at the corners. They’re tied into the walls with successive courses of barbed wire interlaced through the wall, as well as having rebar stakes driven through them at angles into the ground and through the walls before they are coated with stucco or render.

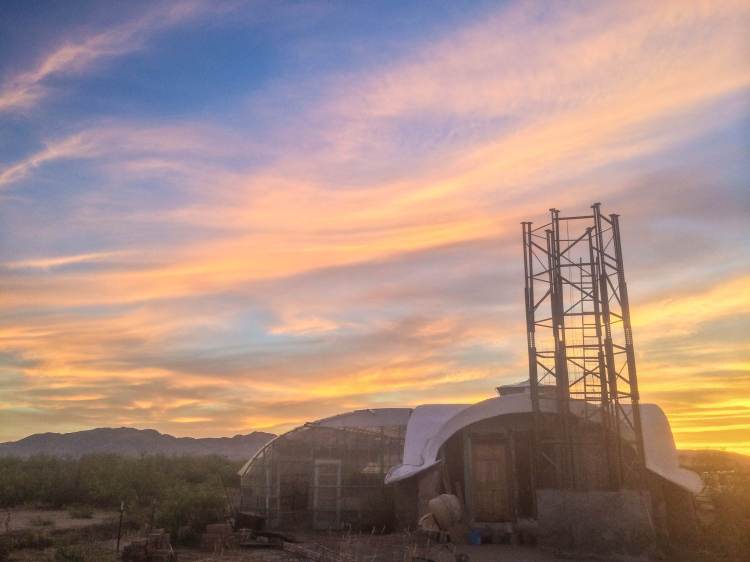
A fine Arizona sunset backdropped behind a section of the south-facing wall. Note the pilasters at ten foot intervals along the outside wall.

Silhouette of friend walking on the wall and one of those classic southwestern sunsets we get so often. All the clutter in this photo is temporary bracing put in place to hold the doorways and rough window openings level during construction.

Another view of a wall with stucco netting.
Above: same wall and windows once the paper-adobe-lime render had been applied. The dark area at the roof is the ferrocement starting to be applied. The upper section of this wall has since been covered with burlapcrete.

Here you get a glimpse of the east facing wall (far left) and the fact that this building is actually a hybrid structure in terms of wall composition. It also looks kind of funky at this stage. Don’t worry, its gotten better with age.

The east facing wall is composed of recycled insulated panels from a dismantled walk-in cooler. Several inches of foam sandwiched between two 3/4 inch thick pieces of plywood, skinned (in most cases) with stainless steel. This wall went up in two hours, the others took months of hard labor. It was sobering to note the disparity. Each section was 2 feet wide and 8 feet tall, we nailed on a continuous bottom plate cinched with barbed wire into the lowest rows of rock filled foundation bags, and seamed the vertical elements with painted 2×6, nailed and screwed into the panels. My dog, Snoot, often takes center stage on the job site.


Congratulations, John you’ve transformed into a source of inspiration for many people. Try to follow in your footsteps
Greetings
Hernán
Thank you for taking the time to share pictures of your progress on the net. You are helping many others to see that they can build their own very nice home.
Keep up the great work!
Enjoy the journey.
Nolan
thank you, John, for sharing your experiences w us.
sylvia
I’ve been bitten. Its a passion. We are hoping to start construction soon. Are you still in the south west? I would love to make contact via email to ask more questions and maybe offer help on a current project. I am especially great full that you shared problems and resolutions.
Wow, I can’t believe you lifted all those bags onto the walls! We built a bag house using a bobcat. Use the bobcat and hose to wet a pile, stir it around with the bobcat, dig up a bobcat bucketful and move it over to the wall and lift it into position just outside the wall (you need to make a dirt ramp after the wall gets higher so the bobcat stays balanced when lifting the load high). Get on the wall with your bags and a bag frame, shovel the wet dirt out of the bucket into the bag and set it in place. One bobcat bucket holds several bagfulls. Even using the bobcat it was still hard work. I can’t imagine the effort you put into it.
Hi, let me congratule you, I live in tucson but my wife and I are planing to build a house in san pedro, sonora, but wonder to know more about eartbag “superadobes” just to know how long take to finish the house, how many people was involved, how big we can build the house, its expensive?, can we visit your project, and of is possible give you a help? thank you again y felicidades!!
Hi there, simply turned into alert to your weblog through Google, and found that it’s truly informative. I’m gonna watch out for brussels. I’ll be grateful if you continue this in future. Lots of people will probably be benefited out of your writing. Cheers!
I wanted to know…do you know anyone in AZ that helps others construct earth bag homes? my brother in law is wanting to make some on his property but doesn’t know a thing about building domes or 4 corner structure of any sort, but the dome ideas are something he and my entire family like, please let me know at galaxy85219@yahoo.com thanks you for your time
Thank you for sharing! You are an inspiration!
Hi John,
Thank you for posting this log. From the other comments I see it’s been about four years since someone’s posted anything, so I have to ask: How has this structure stood up in the intervening years? What problems and what changes would you recommend for those of us following in your footsteps? Please post an updated video of your workshop. We would like to build a home in this manner as well. Keep up the great work!
Bill
I have surplus 14″ & 18″ rolls of woven PP tube available.
Rolls are 6000/lf long priced at $840 & $960/ea sold by the roll only. They are UVI stabilized for 2000 hrs. Price is FOB my facility in Southern California. They are perfect for earth bag building!
Thanks
Steve
949-338-5978
tubedaddy@msn.com
Beautiful, truly a work of art.
This is indeed inspirational, and thanks to the author for sharing! I live in San Francisco myself and had no idea the Palace of Fine Arts building was constructed using a similar burlap technique.
As it happens, I’m involved with an NGO which occasionally holds hotel conferences for large numbers of people. Needless to say this can be quite expensive as hotels charge through the nose. I am wondering whether the construction methods you describe here could scale to a large meeting hall, and if so, whether constructing such a space ourselves using these methods could save us money.
If you think it feasible, any estimate on approximately how much it might cost to construct a burlap-crete building big enough to comfortably seat 1,000 people behind rows of tables with room for a large stage along one wall and tall enough to accommodate large screens for video projection (think typical big hotel chain banquet room or convention/trade show exhibit hall)?
Hello Starchild, I thought I had replied but my notifications here suggest otherwise… I apologize for the delay. I really have no idea what the design limits of burlapcrete are, and for most construction projects, using alternative materials often requires an engineer or architect signing off on it. I have done only basic testing of the material, though it is holding up quite fine almost 8 years later…
John, are you still living at this location? I would love to come for a visit to see how things have progressed since you built the structure. I am in San Tan Valley and just recently visited CAL Earth….I want to build my own house.
Hello Tamra, John with the alternative construction journal / house photos here. I thought I’d replied but looking through old notifications, your query shows as having not been responded to… Yes, I am still living in the house, I’ve done a fair bit of back-and-forth between AZ and CA in the past few years, but currently in AZ. There are some new photo updates, feel free to email me directly at desert_garden@icloud.com Thanks!
Excellent article! Very inspiring. I would like to get some hands on experience. Are there any workshops this winter in AZ?
I hadn’t been online here in ages- I apologize for the lateness of the reply. I actually am not currently in contact with other alternative builders or workshops- been coming back to AZ to work on the house between stints of working in California…
Awesome Job, this is just what I came to see. Own land in Show Low, looking to get some down by Benson.
Very impressed with your work! Would like to discuss possible help from you in my future building.
Hello Debra, sorry for the very late reply- I hadn’t been logging into the administrator end of the site and didn’t realize anyone was commenting… Whereabouts are you located? My direct email btw is desert_garden123@yahoo.com. Thanks!
Sure appreciate the example of local alternative architecture. Lovely photos, as well. Can you recommend anyone in AZ (central AZ is preferred, but we can travel) who does workshops on earthbag building? Thanks for your time.
Hi Laurie, I’ve been out of the loop for quite some time and not keeping abreast